My previous post on Interactables with Direct and Ray Interactors felt a little scattered. I decided this week to separate each of those topics to dive in deep with each of these topics.
If you wish to hop in and try this tutorial out, download this Github project found here. Once downloaded and opened up in Unity, navigate to the Scene labeled “1 Grabbable Objects” and we can get started.
1: Making Interactable Objects
Add a 3D Object Sphere to the scene. Scale it down to (.2, .2, .2) so it will be the size of a ball and move it to the top of the table in the scene.
Now go over to the Inspector and click Add Component at the bottom. Look for XR Grab Interactable and add it to the object. Notice that it adds a Rigidbody to the object. The XR Grab Interactable requires you to have a Rigidbody on the object in order for it to work.
Now copy the ball twice and move them to side of the original ball. Put a different material on each of the new balls so we can tell the difference between each one.
Choose the left most ball and make sure it is set to Instantaneous. The middle should be set to Kinematic. The last one should be set to Velocity Tracking.
2: XR Grab Interactable Movement Types
The reason we made three different balls was to showcase the difference in movement types.
Instantaneous – This type will move with your hand when you grab the object without any physics. It actually disables the Rigibody when you are holding the object so it will clip through anything.
Instantaneous
Kinematic – This type will give a movement delay and be influenced by your hand’s physics. It is able to pass through objects that do not have a Rigidbody when held, but will collide with them when it is not held.
Kinematic
Velocity Tracking – This one also has a delay in tracking as it’s simulating force being added to a handheld object. When holding it, it will collide with all objects even if they do not have a Rigidbody. It’s great for simulating physics with a door or cabinet object or bowling ball.
Velocity Tracking
3: XR Grab Interactable Attributes
The XR Grab Interactable component doesn’t just stop at movement types when it comes to customization. Here I will list some important attributes that will help make you grabbable objects more fine tuned for whatever you’re building.
Interaction Layer Mask – This can be used to assign your objects to different interaction layer masks. An example would be preventing an object from interacting with the player body causing unwanted collisions.
Track Position – This determines if an object should track the position of the thing grabbing it. You might want to turn this off if you were only interested in the rotation of the object relative to the hand grabbing it.
Smooth Position – When checked, this will allow you to smooth out the movement of the object in hand. This is great for simulating weight of an object.
Track Rotation – This is great for toggling on or off if you want to follow the hands rotation or ignore it.
Smooth Rotation – Just like smooth position, this will smooth out the rotation of the hand when played with.
Throw on Detach – This can help stop the object from being thrown if that isn’t desired from the player. If toggled on, you can change various attributes such as velocity scale to alter how the object acts one released from the player’s hand.
Attach Ease In Time – When grabbing the object, this will determine the time it takes to attach to your hand. It produces a very cool floating towards your hand over the set period of time.
4: Attach Points
Currently all our objects just attach to our hands in the center, which may not always be desired. To demonstrate this, we’ll add a gun to the scene.
Go to the Prefabs -> 1 Grabbable Objects folder and add the gun to the scene. Position it to be on the table.
Add the following components:
XR Grab Interactable (This should also automatically add a Rigidbody)
Box Collider (Readjust so the box collider maps relatively closely to the gun)
Now when we pick up the gun, it looks kind of goofy.
To fix this we need to add an attach point as a child to the main gun object. Right click and add an empty child, naming it attach point.
To understand how to set up Anchor Points correctly, we need to look at the X(red), Y(green) and Z(blue) Axis.
The Y Axis should be pointing up in the direction we want our object to point up.
The X Axis should be pointing towards where we want the palm of our hand.
The Z Axis we want to have facing in the direction we want our object to face.
Take note that this should all be based off of local rotation and not global.
Select the attach point and rotate it so it’s Z Axis faces forward, Y Axis points up, and X Axis faces towards where you want the palm of your hand to be.
Last, we need to let the XR Grab Interactable script know that this is our attach point by assigning it.
Now our gun should attach like normal!
5: Interactable Events
Having a gun is nice, but shooting it would be a little more fun. I’ve already attached a script to allow us to shoot the gun so I won’t go over that here.
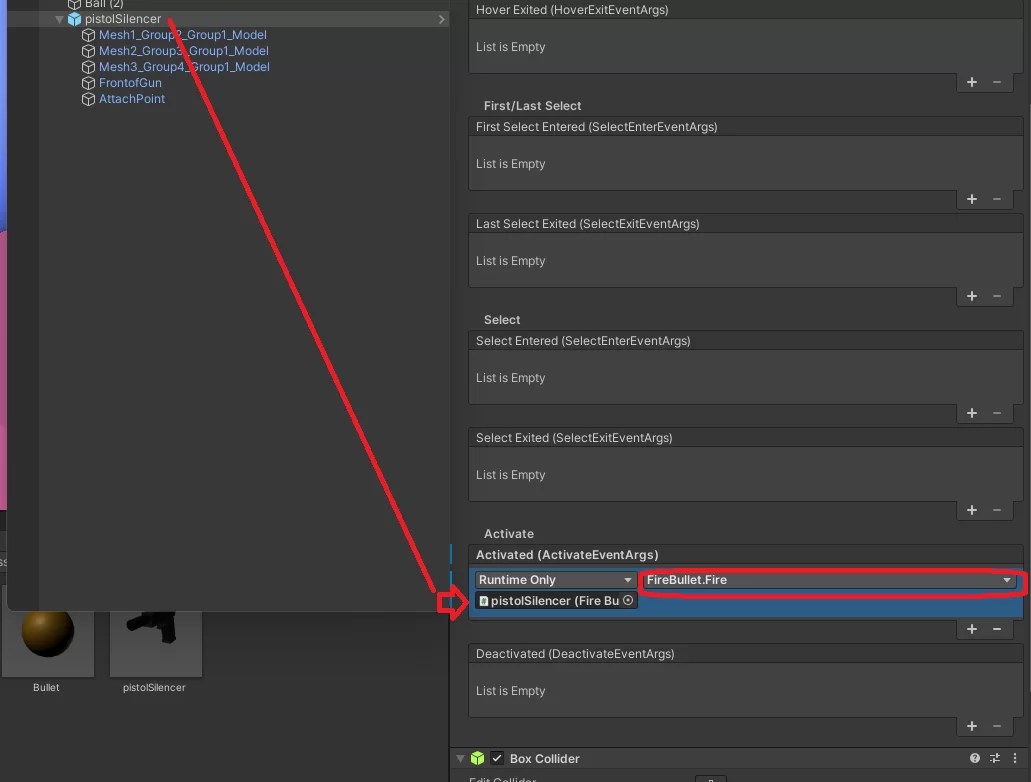
For now, navigate to the gun object in the scene and click on it. Locate the XR Grab Interactable component and drop down the menu for Interactable Events.
From here, we can choose numerous events to activate at different times with our grabbable object. Since we want to fire the gun, it makes the most sense to use the Activated event. This event is set off when we pull the trigger on the controller.
Click the plus button and drag the gun object into were it says “None (Object)”. Click the drop down under Activated and find the FireBullet. Select the Fire function.
Now you can go in the scene, pick up the gun and fire!
That's it!
That’s the basics of grabbable interactable objects. Hope this helps and keep on creating cool things!